(Revisited) Secure yourself, Part 1: Air-gapped computer, GPG and smartcards
Revisited at 2017-06-25:
- Updated for Debian Stretch
- Added 9. Signing others people’s keys
- Added 10. Renewing your keys
This blog entry is part of a series covering:
- Logging into your laptop and decrypting it automatically
- Encrypting and decrypting any passwords or secure info you have
- Sending and receiving encrypted mails
- Providing 2-step authentication codes for your web logins
- Doing all of the above on your mobile phone
- Authenticating for sudo on your machine
- Managing your ssh keys seamlessly
- Signing intents, that can be used for opening a door, etc
####Disclaimer
Of course, this is not 100% secure and this guide does not cover all corners, nor is “3 letter agencies”-proof. Think of it as a hobby from which you can learn: in the end is all about compromise, and I choose to draw the line in an arbitrary place, much like anyone else. Feel free to contact me if you see a hole or want to make suggestions.
PART 1: Air-gapped computer, GPG and smartcards
In this part we will learn about:
- Setting up an air-gapped computer
- Creating the GPG keys and subkeys
- Publishing the public key
- Configuring and loading the keys into a Yubikey Neo
- Backing up the keys
- Setting up another computer for the Yubikey Neo
- Migrating from your old keys
- Revoking the subkeys in case of emergency
- Signing others people’s keys
- Renewing your keys
Before starting, let’s learn some concepts. There are 3 different types of information that can be used for authentication:
- Things only you are or do (e.g: your fingerprint, biometrics, usernames)
- Things only you know (e.g: the combination of a pad, passwords)
- Things only you have (e.g: a metal key, your phone, 2-step authentication tokens)
The first class, “things you only are”, is a bit blurry, as it can be morphed into the second, “things you only have”: for example a fingerprint can be easily obtained from left-overs (a plastic bottle or a cup), can be copied easily with household items and cannot be changed at will if compromised. Or someone can remove your finger from your hand, and most scanners won’t notice. That’s why biometrics should be used only as “usernames”. In contrast, a strong private password can only be sniffed out when you use it, and you are not leaving it anywhere you go.
The most comprehensive solution would be to use the 3 types of information, called as you know a 2-step authentication scheme: you use the thing you only are and you only know (login and password) and then a token you only have in that moment (a one-use code, or a code generated by a device that needs your credit card or your phone). An attacker would need to guess the password an steal your device to succeed.
Our token that we only have is going to be a yubikey NEO, which is a little durable USB key with one capacitive button. You can put it in your keyring, or better, on a bracelet that you keep always with you. Is quite possible that this kind of device will be the norm in 10 years: NFC-capable rings that store your passwords and log you in every thing imaginable, automatically.
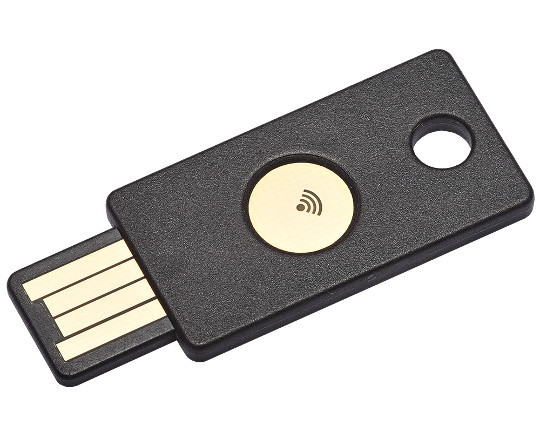
The Yubikey Neo provides us with:
- One Time Passwords (OTPs) by the USB.
- Can also serve OTPs by NFC, and read them on an Android phone with the Yubico Auth app.
- Has secure element and JavaCard capabilities so it can act as a smartcard and contain a set of GPG subkeys. All the encryption/decryption happens inside the Yubikey, and it’s not possible to extract the keys.
- And can also serve 1 static password by USB too.
For setting up our security scheme and our Yubikey, we need some foundations: an air-gapped computer.
1. Air-gapped computer
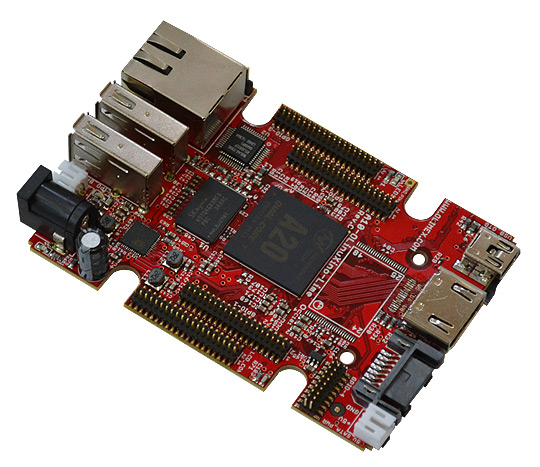
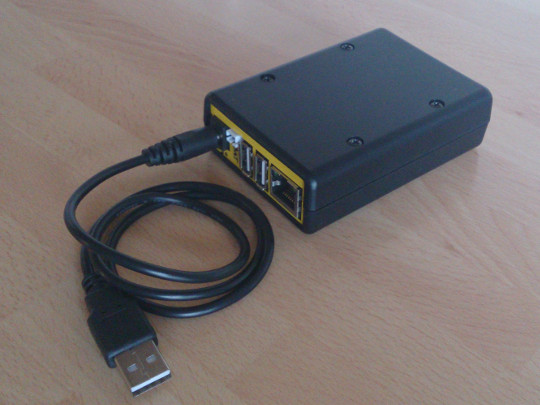
An air-gapped computer is one that is neither connected to the internet nor connected to any other system that is connected to the internet. For this purpose, a computer on a board is quite useful, such as a Raspberry Pi, a Beaglebone Black, etc. All of these are FOSS hardware, cheap (~40€), portable (credit card sized), have no on-chip wireless network connections so when it is not networked you are sure of it (unlike, lets say, a smartphone and their broadband chips), their microSD cards can be easily changed to carry different air-gapped computers and can be stored easily or even made tamper-proof with epoxy.
I’m going to use an Olimex A20 Olinuxino Lime , as is what I currently have.
This computer will be used to generate our master GPG keys and subkeys, signing with our master keys, building and signing a binary, etc. We will move files in and out of our offline computer by an usb stick, which shouldn’t be too much of a handicap as these operations are rarely done.
Installation
For that, we are going to install Debian Jessie with no blobs (privative software) and simple frame buffer support on the A20 Olinuxino Lime. That will let us have a console on the HDMI output.
Nowadays, The Debian installer works out of the box for this board
If you choose to make the installation, follow the steps for making the SD card
image as instructed in the [Linux-sunxi wiki][5] (shameless plug: I contributed
to those pages of the Linux-sunxi wiki). For building U-Boot, use the
A20-OLinuXino-Lime_config, and use Olimex A20-OLinuXino-LIME as the device
name for flash-kernel.
After you have your system running, update and install the following packages (if in the future you want to install new packages, remember that you will need to download the .debs and install them by USB).
# Update the system:
$ sudo apt-get update && sudo apt-get dist-upgrade
# For console and keyboard configuration:
$ sudo apt-get install console-data keyboard-configuration
# For checking GPG keys:
$ sudo apt-get install hopenpgp-tools
# For backing up the keys:
$ sudo apt-get install paperkey qrencode
# For using and configuring the Yubikey:
$ sudo apt-get install python-yubico python-yubico-tools yubikey-personalization
# For smartcards:
$ sudo apt-get install pcscd scdaemon pcsc-tools gpgsm
# For encrypted filesystems:
$ sudo apt-get install cryptsetup libpam-mount
# And install the packages you want:
$ sudo apt-get install git zsh tmux vim w3m
At this point, with Debian Stretch, this gives us:
$ sudo apt list scdaemon gpgsm pcscd gnupg
Listing... Done
gnupg/stable,now 2.1.18-6 amd64 [installed]
gpgsm/stable,now 2.1.18-6 amd64 [installed]
pcscd/stable,now 1.8.20-1 amd64 [installed]
scdaemon/stable,now 2.1.18-6 amd64 [installed]
As stated in this openPGP best practices guide, Put Jacob Appelbaum’s hardened gpg.conf as yours and read and understand it:
$ wget https://github.com/ioerror/duraconf/raw/master/configs/gnupg/gpg.conf ~/.gnupg/gpg.conf
# Enable ssh support:
$ echo "enable-ssh-support" >> ~/.gnupg/gpg-agent.conf
Now we can disconnect from LAN and be off-line. Of course from now on, don’t interface to your Olinuxino by UART, ssh or else: connect it to an HDMI screen and its own cabled keyboard.
Usage
If in the future you need to use again the computer, you will surely need to set the watch again with:
$ sudo date -s "15 MAY 2015 11:14:00"
A better option would be to connect a Realtime Clock Module with a battery to it, such as this one, or this other one. There are many other modules, and are quite cheap. In our case, this SoC board has a RTC included: you only need to connect a battery to the Olinuxino and it will mantain the time (the controller is not already in the Mainline Kernel, so you will need to wait a bit for it).
In case you need to configure the console or connect a keyboard with different locale than what it is currently configured you can run:
$ sudo dpkg-reconfigure console-data
$ sudo dpkg-reconfigure console-setup
$ sudo dpkg-reconfigure keyboard-configuration && service keyboard-setup restart
Now you can lay back and contemplate your air-gapped secure computer up and running!
2. Generating the GPG keys
We are going to generate a master GPG key pair, and a subkey pair. If you want to get a peek on how public key cryptography works, this video is quite good. For more information about Subkeys I recommend reading the Debian page about Subkeys and this StackOverflow post. And now that you are at it, take a peak at this OpenPGP best practices recopilation. The master key pair is going to be used for signing other people keys and issuing new subkeys. The subkey is linked to the master keys, is going to be stored inside our Yubikey Neo, and will be the one that we will use for encrypting and decrypting. You can make more subkey pairs if you want and because they are linked to the master pair your friends don’t need to re-sign them if you lose them or become compromised. When generating the subkey pair remember that the Yubikey Neo can only store and work with keys up to 2048 bits.
As the Yubikey doesn’t allow us to make a 4096 master keypair, and 3 subkeys to that keypair that we can backup, we are going to generate the keys inside the air-gapped computer.
The expire date will be 1 year, with manual extending every year (see here the reasons why).
Generate the master keys:
# Generate a new master key:
$ gpg --full-gen-key
Your selection? 4 (RSA sign only)
What keysize do you want? (2048) 4096
Key is valid for? (0) 1y

# Add more user ids as desired:
$ gpg --edit-key <key id here>
gpg> adduid
# Select your primary uid:
gpg> uid 1
gpg> primary
gpg> save
Make a revocation certificate:
$ gpg --output \<your@email.org\>.gpg-revocation-certificate --gen-revoke your@email
Make a backup of the master keys:
$ gpg --export-secret-keys --armor your@email.org > \<your@email.org\>.private.gpg-key
$ gpg --export --armor your@email.org > \<your@email.org\>.public.gpg-key
$ mkdir backup-master-keys
$ mv \<* backup-master-keys/
Generate the subkeys:
$ gpg --expert --edit-key <key id here>
gpg> addkey
Your selection? 4 (RSA sign only)
What keysize do you want? (2048) 2048
Key is valid for? (0) 1y
gpg> addkey
Your selection? 6 (RSA encript only)
What keysize do you want? (2048) 2048
Key is valid for? (0) 1y
gpg> addkey
Your selection? 8 (set your own capabilities)
Toggle: a,s,e so it is for Authentication
What keysize do you want? (2048) 2048
Key is valid for? (0) 1y
gpg> save
Make backups of the subkeys:
$ gpg --export-secret-keys --armor your@email.org > \<your@email.org\>.master-key.gpg-key
$ gpg --export-secret-subkeys --armor your@email.org > \<your@email.org\>.subkeys.gpg-key
$ mkdir backup-subkeys
$ mv \<* backup-subkeys/
3. Publishing the public key
Put it in the keyservers and in your web page:
# On your air-gapped computer:
$ mkdir ~/usb
$ sudo mount /dev/sda1 ~/usb -o uid=1000,gid=1000,rw
$ cp publickey.txt ~/usb/
$ sudo umount /dev/sda1

# On your networked computer:
$ gpg --import < /media/8GB/publickey.txt
$ gpg --send-keys <key id here>
4. Setting up the Yubikey Neo
Connect the Yubikey to your air-gapped computer. Make sure the eject flag in the Yubikey is set to 82 for OTP and CCID compatibility:
$ ykpersonalize -m82 # take it out and plug it back to restart it
and that you have a recent firmware version, 3.1.8 or later; use lsusb -v to
find out. Also, make sure that you are using a recent Yubikey Neo that is not
vulnerable to CVE-2015-3298. If it is, know that you are entitled to a
free replacement + free shipping (even if you can just patch it).
After that, configure your smartcard:
$ gpg --card-edit
gpg/card> admin
# Change PIN and Admin PIN: (default are 123456 and 12345678 respectively)
gpg/card> passwd
1 - change PIN
2 - unblock PIN
3 - change Admin PIN
4 - set the Reset Code
Q - quit
...
Your selection? 1
PIN changed.
...
Your selection? 3
PIN changed.
...
Your selection? q
# Change the card's info:
gpg/card> name
...
gpg/card> lang
...
gpg/card> sex
...
# Set the url to where your public key is (keyserver, your page, etc):
gpg/card> url
...
gpg/card> login
...
gpg/card> quit
And move the subkeys to the smartcard (this will really move the subkeys, not copy them, so make sure you have the backups if you want to use this same subkeys in another Yubikey for example):
$ gpg --edit-key <key id here>
...
gpg> toggle
...
gpg> key 1 # select 1
...
gpg> keytocard
...
Please select where to store the key:
(1) Signature key
(3) Authentication key
Your selection? 1
...
gpg> key 1 # deselect 1
...
gpg> key 2 # select 2
...
gpg> keytocard
...
Please select where to store the key:
(2) Encryption key
Your selection? 2
...
gpg> key 2 # deselect 2
...
gpg> key 3 # select 3
...
gpg> keytocard
...
Please select where to store the key:
(3) Authentication key
Your selection? 3
...
gpg> save
Make backups of the stubs:
mkdir backup-masterstubs
$ gpg --export-secret-keys --armor your@email.org > \<your@email.org\>.master-stubs.gpg-key
$ gpg --export-secret-subkeys --armor your@email.org > \<your@email.org\>.subkeys-stubs.gpg-key
$ gpg --export --armor your@email.org > publickey.txt
$ mv \<* publickey.txt backup-masterstubs/
Take the ~/backup-masterstubs/publickey.txt and put it on the URL you specified on the Yubikey Neo.
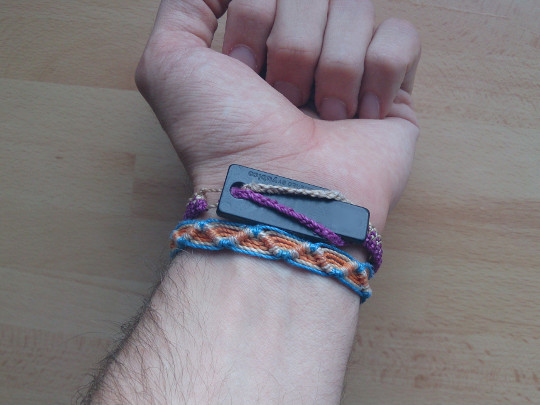
And you have your Yubikey set up! Hook it to your keychain or as I have done, put it on a wristband:
5. Backing up the keys
You should backup you primary keypair and revocation certificates inside of your air-gapped computer in an USB flash drive for example:
$ sudo mount /dev/sda1 ~/usb -o uid=1000,gid=1000,rw
$ cp backup-* ~/usb/
$ sudo umount /dev/sda1
You can also put the keys on paper using Paperkey, which displays just the “secret bits” of the secret key for you to copy by hand (≈ 149 bytes). Remember, if you use a printer, the key can be disclosed on the printer’s memory. You should also store your air-gapped computer in a safe place too, or at least its microSD.
6. Using the Yubikey Neo in other computer
Configuring the machine
Install the needed packages:
# For smartcards:
$ sudo apt-get install pcscd scdaemon pcsc-tools gpgsm
# gnupg v2.1, for Yubikey, and ssh auth compatibility is already installed
If you are using Gnome 3 (or something based on it), we have a problem. The
gpg-agent protocol implementation of gnome-keyring is very incomplete and
hence breaks at least the smartcard functions of gpg and most functions of
gpgsm. Instead of using it, we are going to deactivate gnome-keyring-daemon
ang use gpg-agent instead. The best solution I have found is the one in
the gnupg mail list:
mkdir ~/.config/autostart/
cp /etc/xdg/autostart/gnome-keyring-gpg.desktop ~/.config/autostart/
echo 'Hidden=true' >> ~/.config/autostart/gnome-keyring-gpg.desktop
If you want to have a look at how I have configured it, you can peek at my salt configs, which include the gpg-agent workaround and my shareable configs, plus other goodies.
Fetching the keys
Fetch the public key and make the stub keys:
$ gpg --card-edit
gpg/card> fetch
	gpg: solicitando clave 0x223F15CA5AAF0E78 de http servidor viccuad.me
	gpg: clave 0xA2591E231E251F36: clave pública "Víctor Cuadrado Juan <me@redacted>" importada
	gpg: Cantidad total procesada: 1
	gpg:               importadas: 1  (RSA: 1)
gpg/card> quit
Now you should see that you have stubs in your gpg private key (sec#, with # meaning stub, nude key). In my case:
$ gpg -K
/home/vic/.gnupg/secring.gpg
----------------------------
sec#  4096R/0xA2591E231E251F36 2015-05-13 [caduca: 2016-05-12]
      Huella de clave = E3C5 114C 0C5B 4C49 BA03  0991 A259 1E23 1E25 1F36
uid                            Víctor Cuadrado Juan <me@redacted>
uid                            Víctor Cuadrado Juan <victorcuad@redacted>
ssb>  2048R/0x223F15CA5AAF0E78 2015-05-13
ssb>  2048R/0x7413065A8F779586 2015-05-13
ssb>  2048R/0x3B1500BD8C0124E3 2015-05-13
Mark the key as ultimately trusted:
$ gpg --edit-key <your key id here>
gpg> trust
your decision? 5
Do you really want to set this key to ultimate trust? (y/N) y
gpg> quit
7. Migrating from your old keys
If you are moving from an old keyset to the new ones we have just created, you should sign the old key with the new one, write up a transition statement and revoke the old key. A sane thing to do is to also backup that old keypair, so you can decrypt old files in case you need it.
Signing the old key
To sign the old key, export it, move it to the air-gapped computer, sign it and share it:
# On your networked computer:
$ gpg --export --armor <old key id here> > oldkey.txt

# Copy oldkey.txt to a USB stick and connect the stick to your air-gapped computer

# On your air-gapped computer:
$ sudo mount /dev/sda1 ~/usb -o uid=1000,gid=1000,rw

# Import the key and sign it:
$ gpg --import < ~/usb/oldkey.txt
$ gpg --sign-key <old key id here>
Really sign all user IDs? (y/N) y
Really sign? (y/N) y

# Export the old key and copy it to the USB:
$ gpg --export <old key id here> > ~/USB/signed-oldkey.txt
$ sudo umount /dev/sda1

# On your networked computer:
$ gpg --import < /media/8GB/signed-oldkey.txt
$ gpg --send-keys <old key id here>
Make a transition statement
About transition statements, This is a good example of one. Clearsign it with both keys (old and new), and then publish it in a stable place. Don’t forget to update the references you have to your GPG key too (email signatures, about page, presentation cards, etc).
# On your networked computer:
$ gpg --export --armor <old key id here> > oldkey.txt
$ gpg --export-secret-keys --armor <your old key id here> > secret-oldkey.txt

# Copy oldkey.txt and your transition statement to a USB stick and
# connect the stick to your air-gapped computer

# On your air-gapped computer:
$ sudo mount /dev/sda1 ~/usb -o uid=1000,gid=1000,rw

# Import the key and sign it:
$ gpg --import < ~/usb/secret-oldkey.txt

# Clearsign the statement. Note that we used “<new master key>!" to make GnuPG
# use the master key for signing rather than a subkey, which it would normally do:
$ cat unsigned_GPG_transition_statement_2015-5-15.txt |
gpg --clearsign --personal-digest-preferences "SHA512" --local-user <old key here>
--local-user <new master key>! > GPG_transition_statement_2015-5-15.txt

# Export the old key and copy it to the USB:
$ cp GPG_transition_statement_2015-5-15.txt ~/usb/
$ sudo umount /dev/sda1

# Put the transition statement somewhere public
Revoke the old key
$ gpg --edit-key <old key id here>
gpg> revkey # select a reason
gpg> save

# share the revoked key with the key servers:
$ gpg --send-keys <old key id here>
8. Revoking the subkeys in case of emergency
If your subkeys become compromised, stolen or lost, we will need to revoke them.
Boot up your air-gapped computer, where the master keypair is (and if not,
import them with gpg --import) and then revoke the subkeys:
$ gpg --edit-key <your key id here>
# toggle the subkeys:
gpg> key 1
gpg> key 2
gpg> key 3
gpg> revkey # select a reason
gpg> save
And now you need to export that keys, and publish them on a key server.
9. Signing others people’s keys
Following best practices that come from signing parties, you should:
retrieve the key to be signed from the server with:
gpg --recv-keys 00AA11BB22CC33DD
Verify that the fingerprint matches the one that the person gave you in person:
gpg --fingerprint 00AA11BB22CC33DD
Copy the key to the offline computer (via an USB pendrive, or, if you are going
for the hard way, manually character by character, or with a camera and OCR or
qrencode for example).
Sign it with your master key inside the offline computer:
gpg --sign-key 00AA11BB22CC33DD
Export the signed key:
gpg --armor --export 00AA11BB22CC33DD | gpg --encrypt -r 00AA11BB22CC33DD --armor --output 00AA11BB22CC33DD-signedBy-1A2B3C4D5E6F7G8H.asc
Extract it from your offline computer and send it back to the key owner as an encrypted email (or send it directly to a server). Sending it encrypted is preferred as you can verify the person can decrypt the messages they receive.
10. Renewing your keys
On your offline computer:
amnesia@amnesia ~$ export GNUPGHOME=/media/vic/encrypted/.gnupg
amnesia@amnesia ~$ gpg --edit-key 0xA2591E231E251F36
...
gpg> expire
Changing expiration time for the primary key.
Please specify how long the key should be valid.
         0 = key does not expire
        = key expires in n days
      w = key expires in n weeks
      m = key expires in n months
      y = key expires in n years
Key is valid for? (0) 14m
Key expires at Sun Sept 2018 12:47:48 PM UTC
Is this correct? (y/N) y
...
gpg> key 1
gpg> expire
gpg> key 1
gpg> key 2
gpg> expire
gpg> key 2
gpg> key 3
gpg> expire
gpg> save
export the updated public key:
amnesia@amnesia:~$ gpg -a --export 0xA2591E231E251F36 > /media/KINGSTON/updated-key-<date>.txt
Import the updated public key at your online computer:
gpg --import updated-key-<date>.txt
Update the info in the smartcard:
vic@clotho ~$ gpg --card-status

Reader ...........: REDACTED
Application ID ...: REDACTED
Version ..........: 2.0
Manufacturer .....: Yubico
Serial number ....: REDACTED
Name of cardholder: Victor Cuadrado Juan
gpg --card-status
tor Cuadrado Juan
Language prefs ...: en
Sex ..............: male
URL of public key : https://viccuad.me/assets/publickey.txt
Login data .......: viccuad
Signature PIN ....: forced
Key attributes ...: rsa2048 rsa2048 rsa2048
Max. PIN lengths .: 127 127 127
PIN retry counter : 3 3 3
Signature counter : 536
Signature key ....: 2CB2 AFEA 6744 D33F 789B  6140 223F 15CA 5AAF 0E78
      created ....: 2015-05-13 17:01:11
Encryption key....: 586C 29BD 43C2 665C B1E4  7ED0 7413 065A 8F77 9586
      created ....: 2015-05-13 17:03:44
Authentication key: CDE4 70A9 B479 24CE A620  D4B9 3B15 00BD 8C01 24E3
      created ....: 2015-05-13 17:05:49
General key info..: sub  rsa2048/0x223F15CA5AAF0E78 2015-05-13 Víctor Cuadrado Juan <victorcuad@gmail.com>
sec#  rsa4096/0xA2591E231E251F36  created: 2015-05-13  expires: 2018-09-30
ssb>  rsa2048/0x223F15CA5AAF0E78  created: 2015-05-13  expires: 2018-09-30
                                  card-no: 0006 03507832
ssb>  rsa2048/0x7413065A8F779586  created: 2015-05-13  expires: 2018-09-30
                                  card-no: 0006 03507832
ssb>  rsa2048/0x3B1500BD8C0124E3  created: 2015-05-13  expires: 2018-09-30
                                  card-no: 0006 03507832
Change the public key published in the URL pointed by your smartcard (in my case, at https://viccuad.me/assets/pubkey.txt).
Submit the public key with the new signatures for the expiration to the keyservers:
vic@clotho ~ $ gpg --send-keys 0xA2591E231E251F36
gpg: sending key 0xA2591E231E251F36 to hkps://hkps.pool.sks-keyservers.net
vic@clotho ~ $ gpg --keyserver keyring.debian.org --send-keys 0xA2591E231E251F36
gpg: sending key 0xA2591E231E251F36 to hkp://keyring.debian.org
Sources
- https://linux-sunxi.org/Mainline_Debian_HowTo#Configuring_the_system
- https://www.digitalllama.net/2014/03/importing-your-existing-gpg-key-into.html
- https://www.esev.com/blog/post/2015-01-pgp-ssh-key-on-yubikey-neo
- https://blog.josefsson.org/2014/06/23/offline-gnupg-master-key-and-subkeys-on-yubikey-neo-smartcard
- https://www.2realities.com/blog/2014/11/04/yubikey-slash-openpgp-smartcards-for-newbies
- https://blog.habets.se/2013/02/GPG-and-SSH-with-Yubikey-NEO
- https://alexcabal.com/creating-the-perfect-gpg-keypair
- https://github.com/serginator/cheatsheets/blob/master/md/security/gpg.md
Version of this post in Markdown
If you want a Markdown version of this blog post for further reading or backup you can download it from here.
Japanese translation
The non-revisited previous blog post has been translated to Japanese by https://postd.cc news website. You can find it here.

Víctor Cuadrado Juan
I'm Víctor Cuadrado Juan, a developer and FOSS enthusiast, in love with Linux. Currently living in Nürnberg, Germany. Feel free to waste your precious time around here, or to contact me.